

It’s Sew Easy!
In this unit, we will study the environmental issue of fast fashion; research a time period and create a period specific outfit for our fashion show; learn the basics of hand sewing and create a sampler; and learn the basics of machine sewing and create a project.
Hand Sewing
In this section of the unit, you will learn basic hand sewing skills and produce a sampler of those skills as your final project.
Sewing Sampler – Final Project
In this project, you will create a sampler of the skills you have learned. You may use the videos linked below as a review to help you. You may also ask classmates for advice, but all work must be your own. I will not help you, as this is considered a test.
Process:
- Get your sewing bag, a fresh piece of cloth, CONTRASTING thread, a ruler (the clear ones work best), and a pair of scissors.
- Trim your cloth into an 8″ x 8″ square. Do this carefully, as it will impact all of your other work.
- Create a 1″, double fold hem to the backside on one edge, using the slip stitch method. Remember that the final width of your hem will be 1/2″ because it is a double fold.
- Attach your button using the 4-hole method.
- Whip stitch the entire raw edge opposite your hem.
- Sew a row of running/straight stitch from side to side in the same direction as your hem.
- Sew a row of running basting stitch next to the running/straight stitch.
- Sew a row of back stitch next to the basting stitch.
- Trim all excess threads and ensure project looks neat and finished.
Your sampler must be completed by the end of class on 2/25, 2/26. We will do a self-assessment and conference grading process on 2/27, 3/2.
Lesson #4: For this lesson, you will create four lines of sewing the long way on your scrap cloth, one line each of: running basting stitch, running/straight stitch, whip stitch, back stitch. Show it to Ms. Mahoney for a grade when you are finished. You have two class days to complete this assignment.
Use this graphic and the video linked below to guide you:
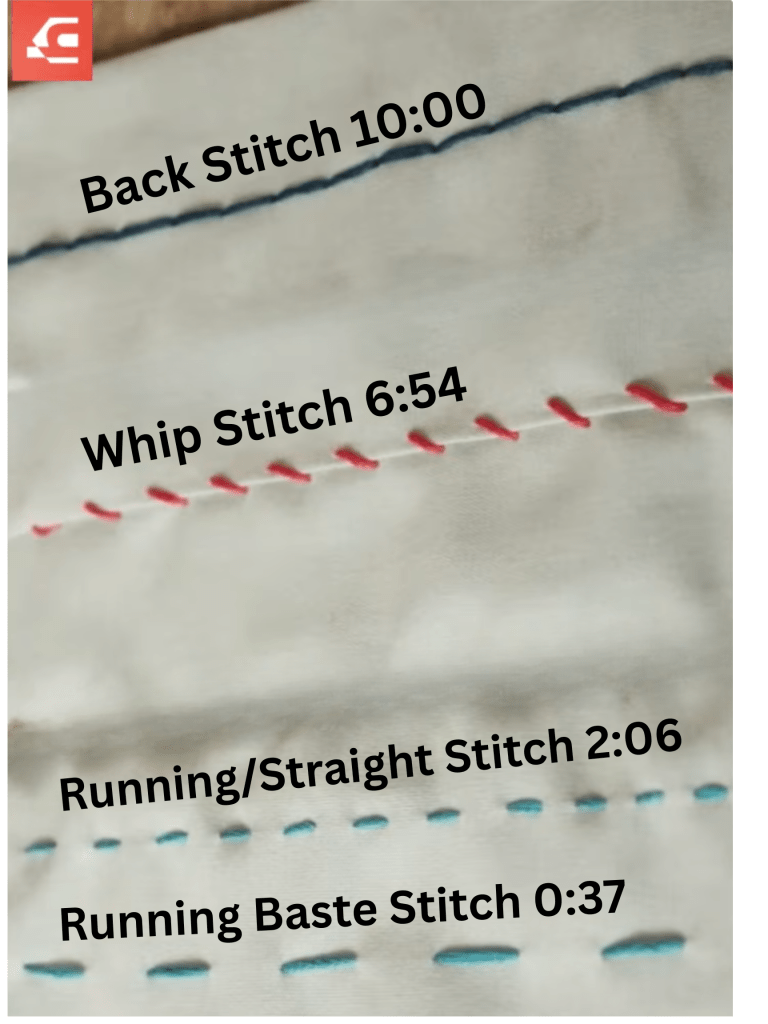
Video: https://youtu.be/xvxqtc8thRg?si=Y6rzwGOKQjn6_ERO
Lesson #3: For this lesson, you will create a 1″ hem on the long side of your scrap material using the slip stitch method and show it to Ms. Mahoney for a grade.
Procedure:
- Clear your material of your button and any threads. Put your button in your bag.
- Thread your needle with thread that contrasts with your material to make it easy to see. Use the thread doubled. (In the real world, you would choose a thread as close in color to your material as possible.)
- Using a ruler and a writing utensil, draw a straight line all the way across the long edge of your scrap cloth.
- Use scissors to cut on the line, creating a straight edge.
- Lay your cloth on the desk, back side up. (If your cloth is one color, either side can be up.)
- Using the ruler as a guide, fold the cloth on the edge you just trimmed up 1″ and pin into place.
- Now fold that piece in half under itself so the fold is 1/2″ and pin. You should now have a “tunnel” of cloth on one long side of your cloth that is 1/2″ from top to bottom and an additional 1/2″ inside for a total of 1″. This is your hem allowance.
- Using the slip stitch method, sew your hem allowance into place. Be sure to keep your stitches as invisible as possible, and use your thumb nail to help you space the stitches evenly.
- Tie off and trim your thread.
- Show to Ms. Mahoney. If she is not present, place into your bag and then into the class drawer. She will grade it before the next class.
Below, please find linked the video we viewed in class. As you complete this lesson, use it for a reference. We are using the slip stitch process, so the first half of the video is what you need.
- Slip Stitch and Blind Hem: https://youtu.be/jlHyqT4K-p0?si=2M_WCDFccvgPkKhJ
Lesson #2: Please practice attaching your button 5 times. Leave it attached the last time for your grade. The video is below should you need it for reference.
- Sewing on a Button: https://youtu.be/Du6gq3ks0SQ?si=IFzr-J2x-h7Lvyxz
Lesson #1:
- Threading a needle: https://youtu.be/oHwggj5EN_Q?si=dEmAq8MTLNMkR1o3
- Knotting your thread: https://youtu.be/PowkA9Bojlo?si=lAlFqIaeHcCXllqQ
Fashion of the Eras
After our discussion of fast fashion, you will break into groups, receive your time period, research your time period, and create a design drawing of an outfit that is typical of your era (top and bottom, plus accessories if applicable). You will present the design and give a brief oral presentation about your era’s fashion to Ms. Mahoney. Following that, you will create your fashion out of gift wrap and tape provided to your group. Finally, we will hold a fashion show of your models wearing the created outfits.
Specifics:
- Break into 4 approximately equal groups.
- Get your index card with your fashion time period.
- Research the typical fashion of the time period and choose an outfit style. (HINT: a place to start… https://fashionhistory.fitnyc.edu/category/decade-overview/)
- Create a design drawing of an outfit from the period complete with accessories. Use color.
- Submit the drawing to Ms. Mahoney by the end of the class. (1/7, 1/8 – Written work grade)
- Prepare a brief oral presentation on your design, noting the unique qualities that let people know which era it is from (how is it different from what came before/after). Present as a group to Ms. Mahoney. (1/9, 1/12)
- As a group, use your design drawing to create your costume out of wrapping paper and tape. Each group must have a model and a song to walk the runway.
- In the last 20 minutes of class, we will hold our fashion show and vote for the winner. (1/13, 1/14 – Presentation grade)
Props – Swords!
Props are an integral part of theatre. They help to tell the story and make it more realistic.
Props are any items an actor might carry onto the stage, off of the stage, or move/use on the stage during the course of a performance.
As our first prop, we will be building our own swords out of cardboard/foamboard. You will design the sword, then build your sword to your design specifications as closely as possible. We will then test the durability of the swords in a mock sword fighting competition.
To begin with, however, we must learn about the huge variety of swords that have been used throughout history. To that end, you will research swords, choose a type, and create a presentation slide about your chosen sword type. Please follow the instructions below to complete this assignment.
Assignment #4: CER Worksheet
At this stage of the process, you should be able to predict whether or not your sword will win in at least one round of fighting. To assert your claim, you must complete the CER (Claim – Evidence – Reasoning) worksheet.
- 1st: State your CLAIM – My sword will (or will not) win in at least one round of fighting.
- 2nd: Give at least two pieces of EVIDENCE to support your claim – My sword is solid/weak.
- 3rd: Elaborate with your REASONING to explain how your evidence supports your claim. Because my sword is six layers, it is strong/Because my sword is thin and single-layered, it is weak.
This worksheet is a Written Work assignment and is due at the end of the class in which it is assigned. (Even day classes – 12/3)
Assignment #3: Build Your Sword
It’s time to build what you have designed. As in all design projects, the concept drawing is great, but you may find during the build that you have to make adjustments. That is totally fine, and is, in fact, part of the expected process.
Procedure:
- Get your sheet of foam board and label it with your full name and class period. YOU WILL ONLY GET ONE SHEET OF FOAM BOARD, SO TREAT IT WITH RESPECT, PLEASE.
- Using pencil and a ruler, LIGHTLY draw out the outline details of your sword and any accessory pieces (hand guard, overlays, etc.). DO NOT PRESS HARD. If you make a mistake, erase it, but if you have pressed hard, your mistake will permanently mark your foam board. (10/28, 10/29)
- Using a sharp blade, CAREFULLY cut out your sword and accessories. (10/30, 10/31) This date is a guideline – PLEASE TAKE YOUR TIME CUTTING! IF WE NEED MORE TIME, I WILL GIVE YOU MORE TIME.
- Assemble and decorate your sword. Your completed sword is due by the end of class on 11/10, 11/12.
Assignment #2: Design Your Sword
Using what you researched, and also what you’ve learned in class, you will design an original sword of your choice.
Procedure:
- Take a piece of graph paper. Each person needs their own as each person will design their own sword.
- Choose a scale for your graph paper design. (I recommend 1 square = 1 inch, but you can use whatever you wish.)
- Write your name and your scale on the top of your graph paper.
- Design your sword.
- Your sword can be no longer than 30″ and no wider than 20″.
- Turn in your design to your class box for a written work grade.
- Your drawing is due by the end of next class. (10/24, 10/27).
Assignment #1: Sword Research Slide
- Research sword types and choose one to research further. (If you don’t know any sword types, trying just Google searching “historical sword types.”)
- Search up at least TWO different reputable sources for information on your sword. (“Google” is not a source. “Wikipedia” can NOT be your only source.)
- Create a Powerpoint or Canva slide about your sword which contains the following:
- a title telling your chosen sword type
- a picture or drawing of your sword type
- a bulleted list of facts about your sword type (aim for 4-5 facts) – make sure to put these in your OWN words (simply copying and pasting will earn you a 0% for plagiarism)
- web links to your sources (at least TWO different sources)
- Your name and class period
- Email your slide (as an attachment OR a link) to colleenmahoney@dadeschools.net before the start of next class (Odd Day – 10/20; Even Day – 10/21). Please remember to give me permission to view any links you send – if I can’t open it, you earn a 0%. Additionally, please write your name in the Subject Line of the email – emails without subjects are automatically sent to trash by our filters, so it will look like you sent it, but I will never receive it
Example slide:

Exploration of Artistic Media – Frida Kahlo
In this unit, you will explore a type of artistic media and learn its qualities by recreating a well-known Frida Kahlo artwork in poster form. Each group will get a different medium: crayons, markers, colored pencils, oil pastels, chalk pastels, or tempera sticks. After working as a group to create a cohesive, colored poster, the group will analyze their medium and create a presentation showing their work and discussing how their particular medium might be useful in a Theater Tech application. This unit will garner each student four grades: 2 participation grades, a written work grade, and a presentation grade.
Phase 1:
- Get a piece of paper from the cup. This is your group for this project.
- Sit at the seating arrangement for your group. There may be extra seats at your arrangement – these are for other classes. Please do not move them.
- Add your name to the group index card. Return the card to Ms. Mahoney and get a packet.
- Choose your pages from the packet. You must get AT LEAST TWO.
- Work with your group to configure your poster. Keep track of your pieces.
- Decide upon a color theme for your poster. The goal is to create a cohesive work of art with a group. (HINT: You may want to look up this work of art to see what the original looks like. You may do an “interpretation” of the original, or you may stay faithful to the original.)
- Using your provided media, color in your poster pages. (Please use scrap paper under and outside of your pages so that you don’t get color all over the desks.) Between classes, please make sure to store your pages (with your name and Group #) in the class drawer.
- 9/29, 9/10 – ALL PAGES MUST BE FINISHED COLORING. You will present your individual pages to Ms. Mahoney for a grade. Completed posters are due at the end of class 10/1, 10/3. Presentations are 10/6, 10/7.
Phase 2 – Assembly:
- Lay your pages out in the proper order. Do NOT trim the edges yet.
- Decide which edges you will tape together – you should have overlap.
- Trim the edges which will not be the underlying overlap.
- Tape your pages together from the back to create your poster.
- While this is happening, your group should also prepare the answers to the presentation questions.
- Get a worksheet (poster rubric + questions).
- Decide upon your answers and write them down in the spaces provided.
- Self-assess your poster according to the rubric provided. Be honest but gentle.
- As a group, bring your completed poster and rubric to Ms. Mahoney for conferencing.
- Practice your presentation.
Phase 3 – Presentation:
During your presentation (October 6/7), your group will present your poster to the class, along with your answers to the four questions. A different group member must present each question’s response (4 questions = 4 speakers). The other group members will hold and display the poster.
Greek Theater
Masks and Emotions:
Assignment #2 – Creating the Masks
For this project, you will use the provided templates and paper to create a wearable, traditional Ancient Greek Theater mask. Please follow the guidelines below.
- Decide the emotion you wish your mask to display. (This should be based on the rough draft you created in Assignment #1.) Choose the mask template type based on that emotion (comedy for happy, upbeat emotions; tragedy for sad, mad, or downbeat emotions).
- Use the template to trace your mask outline on WHITE cardstock. The templates have suggested eye and mouth openings, but they are not cut out because you must make the choices of how you want those to appear on your mask.
- BEFORE CUTTING, please return the mask template to the work counter so that others may use it.
- Cut out your mask, including eye and mouth openings.
- Using the other templates provided, or working freehand, use colored construction paper to create the other parts of your mask. Return the templates, if used, as soon as you are done tracing.
- Your completed mask must:
- Show a clear emotion
- have a hairstyle (bald is a style)
- have eye holes, a mouth space, and a nose
- have accessories of some type (hair, crowns, hair accessories, jewelry, etc.)
- be in color
- have 3-Dimensional aspects including the nose
- The completed mask is due by the end of class on 9/10, 9/11. You will present your mask to me on 9/12 (Odd Day) or 9/15 (Even Day).
For a review of how to create your mask, please watch this video: https://youtu.be/yGFNQWPbeUc
Assignment #1 – Recognizing and Drawing Emotions
- Watch the presentation on masks and emotions.
- On a blank sheet of paper, draw 6 ovals, each about the size of your palm.
- For each oval, create a face which shows the emotions listed – one emotion per oval. (happy, sad, angry, surprised, scared, thoughtful)
- On the back of the paper, draw a face-sized oval. Draw a rough draft of the mask you want to create. You must include eyes, mouth, nose, hair, and accessories (like a hair decoration). It must show an emotion.
- Turn your rough draft in to your class bin when finished. If you do not finish before the end of class, please store your work in the appropriate class drawer to finish next class. Due by 8/28, 8/29.
Links for Ancient Greek Theater videos:
- https://youtu.be/aSRLK7SogvE?si=swj_gTA-zpq_cNIc
- https://youtu.be/i41fSuyMUkE?si=Bzz7MbmTvLpfkA5A
- https://youtu.be/BD8rmXwG9ZQ
- https://youtu.be/0Soyj4Oac3Y
- https://youtu.be/RRq7lLawQB4
Opening of Schools
Please take this survey for your first grade of the year. 🙂
